Cleaning your clothes may be much easier than it was 100 years ago, but laundry day can still feel like one of modern life’s necessary evils. Washing machines and dryers save us countless hours of labor, but it’s easy to forget to take clothes out when they’re done. That can lead to a musty smell if they’re left in the washing machine, or wrinkled items from the dryer.
We developed a solution to this problem based on the Wemos D1 mini ESP8266 dev board. It’s able to sense the vibrations when washing machines or dryers operate, then notes when the vibrating stops and sends an alert to your computer or smartphone.
What You’ll Need for This Build
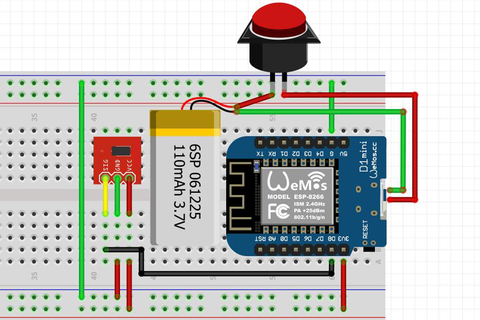
To build this device. you’ll need the following components. See the electrical diagram below to connect each component properly.
- Wemos D1 mini ESP8266 dev board
- D1 mini Lipo shield
- Lipo battery
- solderless breadboard
- hookup wires
- power button/switch
- vibration sensor module
- Rare Earth Disk Magnets

Code and IoT Setup
Here’s how to setup this device to monitor vibration:
- Download and open the code found here using the Arduino IDE and modify the WiFi configuration and the Adafruit IO configuration settings to fit your situation. Log in to your (or create a new) Adafruit account and set up your own “laundrysensor” feed to monitor the correct information.
- Next, upload the code to your Wemos board. Other ESP8266 boards such as the Adafruit Huzzah will also work with a few minor modifications to the input and output pins. We used the “millis()” technique in this code, rather than a delay command. This allows the application to measure each washing or drying cycle. Unlike using the “delay” command, this allows it to read the ShakeSensor input and update its status repeatedly.
- Once the code is settled, you can set up the If This Then That (IFTTT) service to notify you that your laundry is done in a variety of ways. Create a new applet (and account if needed), then search for “Adafruit” and select the option to “Monitor a feed on Adafruit IO.”
- From here, set it up to monitor the “laundrydone” feed and create a trigger. Set up the app to email you, send you a text, or even call you on the phone when the “laundrydone” trigger is activated.
For an introduction to this type of application, check out the Internet of Things Class found here. Lesson 4 deals with this type of monitoring setup specifically, and Lesson 2 addresses software setup. Both lessons are very informative, especially if you install the Arduino IDE or set it up to work with Wemos D1 mini boards.
Physical Implementation

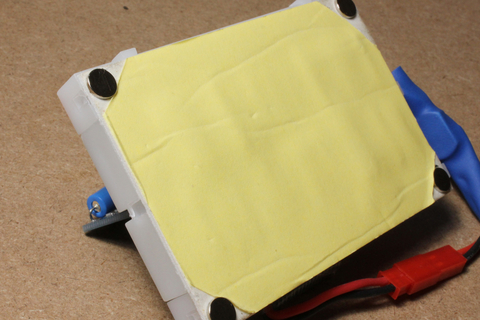
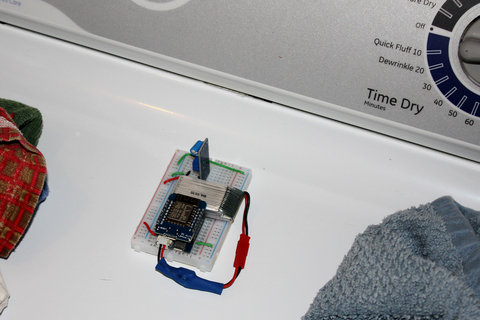
You might be wondering how this device will stay in place. Peel back the four corners of paper covering the sticky surface and attach four magnets to these corners, then apply it to your machine. These magnets will hold the breadboard in place on top of a metal lid or other surface. Alternatively, you could remove the paper and stick it directly to the machine, but your device won’t be easily portable with this method.
Once you place the device on top of your machine, turn it on. If everything functions correctly, you’ll get an email, text, or phone call when your first laundry cycle is complete. Folding your laundry and putting it away is now up to you.
Go Further

The vibration sensor used here should work on most washers or dryers, but if you generally run light loads or have an especially well-tuned machine, it may not sense the level of vibration needed to detect it’s working. An accelerometer may be able to pick up smaller disturbances and vibrations. You may even consider a light-dependent resistor (LDR) that can sense indicator lights that shine (or don’t shine) on some units. If neither of those options will work for your situation, a clamp meter, which detects the actual flow of electricity through a wire, would be a foolproof solution. This, however, would require an extension cable that can be separated into individual wires.
It’s worth mentioning that we built this device on a solderless breadboard. This setup works well as a prototype, but for long-term use we’d recommend using a perfboard. You might even choose to make a custom PCB and case.
Consider using this concept in other applications to monitor a piece of automated machinery. Forecasters expect significant growth in the equipment monitoring market, so there’s no better time to familiarize yourself. Not only is this device versatile, it’s also incredibly affordable, costing around $10 per unit. An ESP8266/Wemos D1 mini board may be the perfect solution for your next project or “things” challenge.
About the authors
Zach Wendt and Jeremy S. Cook are engineers who enjoy hands-on projects. Jeremy writes for a variety of technical publications and Zach works for Arrow Electronics a major supplier of sensor applications.