For more accurate measurements over a wider range, the thermal MEMS accelerometer uses heated molecules rather than a cantilevered beam structure as the proof mass. When subjected to acceleration the less dense heated molecules move in the direction of acceleration and the cool, denser molecules move in the opposite direction, creating a temperature differential. The temperature differential from one side of the MEMS structure to the other is proportional to acceleration. (For more detail, see the application note AN-00MX-001, "Accelerometer Fundamentals" on www.memsic.com.)
As you'll see, the approach that is best for your system depends on the accuracy you need and the temperatures the sensor must tolerate.
Interfaces and Error Terms
Whether capacitive or thermal, all MEMS accelerometers are available with a wide range of user interfaces, such as:
- An analog voltage output proportional to acceleration
- A pulse width modulated (PWM) output proportional to acceleration
- A digital interface such as I2C or SPI
The error components you'll encounter break down into three categories:
- Initial tolerances
- Temperature-dependent errors
- Other inherent errors
Also affecting sensitivity and the 0 g offset, temperature-dependent errors occur due to changes in the ambient temperature. Typically, a low-cost device's 0 g offset will change on the order of 1 mg/°C depending on the device. For example, for a device with a 0 g output duty cycle of 50% at 20°C, the 0 g duty cycle will change as the temperature increases or decreases by 0.02%/°C. Additionally, there may be temperature-related hysteresis, which is to say the duty cycle at 0 g and 20°C may be different if approaching 20°C from 70°C as opposed to approaching from -20°C. An accelerometer with any significant temperature-related hysteresis is unusable in a high-accuracy application without investing in greater testing and calibration overhead.
The catch-all category of other inherent errors consists of errors related to noise, linearity, cross-axis sensitivity, package alignment, and mechanical resonance.
Choosing an Accelerometer
Two factors to consider when selecting an accelerometer for tilt or inclination sensing are the environment the final product will be used in and the required accuracy. All of the capacitive-type, cantilevered-beam, low-g MEMS accelerometers have an inherent resonant frequency typically in the 5 kHz range. If there will be vibrations or energy present at or near this frequency in the application environment, you must take care to dampen this energy or isolate the accelerometer from it, otherwise it will not work properly. The thermal MEMS accelerometer does not use a mechanical structure as the sensing element so it does not have a mechanical resonance frequency. It has a natural low-pass response with a cutoff (3 dB) frequency near 20 Hz so no additional isolation or dampening is required when using this type of accelerometer.
The required accuracy translates to resolution and repeatability because a calibration will be performed to eliminate or minimize the errors. As long as the device is repeatable and sensitive enough with low enough noise, it can be used for accurate tilt measurements (see sidebar "Converting Acceleration into Inclination"). The thermal MEMS accelerometer is very repeatable and its offsets and sensitivities do not change when subjected to large mechanical shocks. It also has no measurable temperature hysteresis. While its noise density is typically larger than that of a capacitive-type accelerometer, filtering or averaging reduces it to an acceptable level.
Your choice doesn't end here, however. Thermal MEMS accelerometers come in a range of sensitivities and in internally temperature-compensated and non-temperature-compensated versions. The non-temperature-compensated version's sensitivity varies as a third order function of ambient temperature but it is repeatable for a given device. Figure 1 shows how the sensitivity of a non-temperature-compensated thermal MEMS accelerometer varies as a function of temperature.
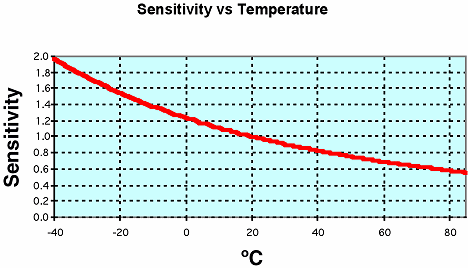 Figure 1. Sensitivity vs. temperature of a non-temperature-compensated thermal MEMS accelerometer |
The 0 g offset of a non-temperature-compensated device as a function of temperature is much smaller than the compensated version and is linear. It is, however, axis-independent and its slope can be either negative or positive. Although it is small, its magnitude is still too big to ignore and so must be addressed.
An Example Design
Let's consider the design of a safety tilt switch for a man-lift, which requires a measurement range of ±10 arc degrees of pitch or roll with an absolute accuracy of ±0.5° over a temperature range of 0°C–70°C. The first step is to translate these application requirements into accelerometer specifications. The full-scale acceleration measurement required by the application is determined by the amount of acceleration due to the Earth's gravity associated with αmax (10 arc degrees) of tilt, which is sin(αmax) or 174 mg. The Earth's gravity serves as a reference source for calibration; although the application requires a full-scale measurement of only 174 mg, the accelerometer must be able to measure ±1 g. The accuracy required is determined by taking the difference of sin(αmax) and sin(αmax + 0.5) = 8.58 mg. Therefore the final solution must have better than ±8.58 mg of absolute accuracy and 4.29 mg of resolution.
A suitable accelerometer for this example's design is Memsic Inc.'s MXD2020EL. A non-temperature-compensated, dual-axis thermal MEMS accelerometer with PWM outputs, the MXD2020EL has a voltage reference and a built-in bandgap temperature sensor. Its nominal sensitivity is 20%/g change in duty cycle of a 100 Hz square wave at 25°C. Figure 2 illustrates a simple schematic for the man-lift application.
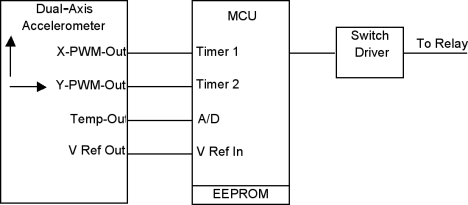 Figure 2. A basic schematic of a dual-axis tilt switch |
Eliminating Errors
The first step toward eliminating errors is to examine the noise of the device and the application's responsiveness requirements to determine a suitable frequency response, because the frequency response will determine the resolution. For accurate inclination applications the frequency response should be as low as the application requirements can tolerate. The MXD2020EL accelerometer has maximum noise density of 0.4 mg/(Hz)1/2 rms, and the man-lift application can tolerate a 1 Hz frequency response. The worst-case resolution is ~3.4 mg (calculated peak-to-peak noise in a 1 Hz bandwidth), which is better than the required resolution of 4.29 mg previously calculated. The effective bandwidth can be achieved by averaging multiple measurements.
The calibration procedure must also determine the sensitivity and 0 g offset for each axis at room temperature, and how they vary with temperature. Their temperature dependence can be adequately determined by measuring at two temperatures, with room temperature as one of the test temperatures.
It is too difficult to align the accelerometer in a plane perfectly horizontal to the Earth in order to measure the 0 g offset, especially after the device has been mounted on a PCB. Additionally, any error in horizontal alignment produces a fairly large error during calibration. However, the 0 g offset and the sensitivity for an axis can be calculated from measurements of ±1 g, and the Earth provides us with a good, consistent source of 1 g. A test fixture, which can rotate in a plane perpendicular to the Earth with positive stops at 0, 90, 180, and 270 arc degrees, is required to calibrate both axes. This fixture must be placed in an oven capable of rising to near 70°C. For a volume application it is advisable to have both room temperature and 70°C test stations. Multiple devices can be placed on a test fixture to achieve the desired throughput.
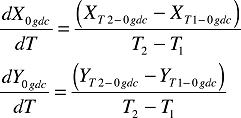
At room temperature (20°C), align the X axis perpendicular to the Earth (Figure 3A), and measure the X axis accelerometer output.
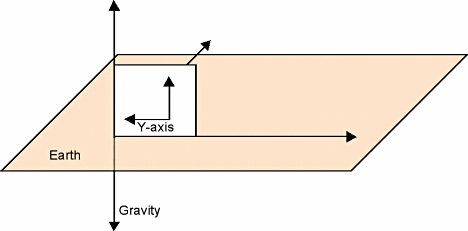 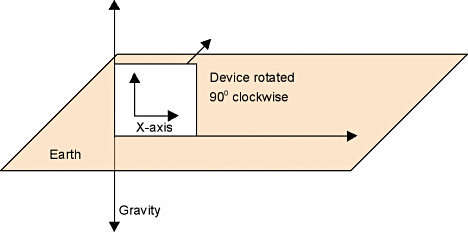 Figure 3. Vertical device orientation for calibration, with X axis perpendicular to the earth (A, top) and with the device rotated 90 arc degrees (B, bottom) |
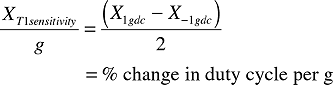
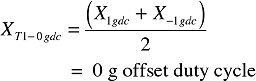
This measurement represents the duty cycle at temperature 1 (T1) associated with 1 g of acceleration on the X axis and is denoted as X1gdc. Now rotate the device 90 arc degrees and measure the output (Figure 3B). This second measurement represents the duty cycle associated with 1 g of acceleration on the Y axis and is denoted as Y1gdc. Rotate the device another 90 arc degrees and measure the duty cycle associated with –1 g of acceleration on the X axis, denoted as X–1gdc. Rotate the device 90 arc degrees one last time and measure Y–1gdc.
For the X axis at T1:
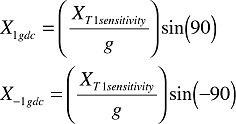 |
(1) |
therefore:
 |
(2) |
 |
(3) |
For the Y axis at T1:
 |
(4) |
 |
(5) |
Repeat this process at 70°C (T2) to determine XT2sensitivity /g, XT2–0 gdc , YT2sensitivity/g, and YT2–0 gdc.
The vertical orientation minimizes any alignment errors because the sine function does not vary much per arc degree at 90 and –90 arc degrees. The error associated with 0.5 arc degrees of misalignment in this orientation is only 0.04 mg.
We can now calculate the slope of the X- and Y-axis 0 g offset versus temperature with Equation 6:
 |
(6) |
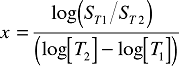
The change in sensitivity versus temperature is derived from Equation 7:
| (7) |
Where:
T1 and T2 are in degrees Kelvin.
Solving for the exponent in Equation 8:
 |
(8) |
Now that you know the exponent (typically it will be ~2.95 for this device), you can correct any change in sensitivity due to changes in temperature.
Results
Having characterized the temperature dependencies of both 0 g offset and sensitivity, you can implement an algorithm to correct acceleration measurements for any given temperature in the device's operating range.
 |
(9) |
Where:
SF = Scale Factor = 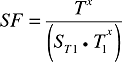 |
(10) |
ΔT = T - T1
Figure 4 summarizes the errors for the device after the calibration, for which temperature sensitivity was calculated using a measurement error of ±0.5°C.
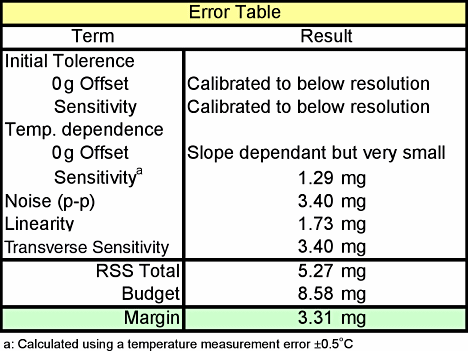 Figure 4. Post-calibration error summary |
Proper Forethought and Final Choices
The thermal MEMS accelerometer approach has no moving parts , which makes it very repeatable, exhibits no temperature hysteresis, and does not have any mechanical resonance to contend with. This makes it well-suited for highly accurate tilt sensing over a wide temperature range. Additionally, once you calibrate the unit, its offsets and sensitivity will not change if it is subjected to mechanical shock.
With proper forethought, you can implement a solution in which the unit calibrates itself by calculating the exponent associated with the temperature-dependent change in sensitivity and slope of the 0 g offset and storing it in nonvolatile memory for use by the main acceleration correction algorithm. Furthermore, if processor bandwidth is constrained, you can use the calculated exponent to generate and store a lookup table in nonvolatile memory.
Be careful when selecting other components of your system. The timing resource used to measure the PWM outputs of the accelerometer must have sufficiently high resolution and repeatability not to reduce measurement resolution or introduce significant errors. The ADC used to interrogate the accelerometer's onchip temperature sensor must also have enough bits to accurately measure <0.5°C. It, too, can be calibrated during the calibration procedure. The more you plan ahead and test, the better your final results.
|
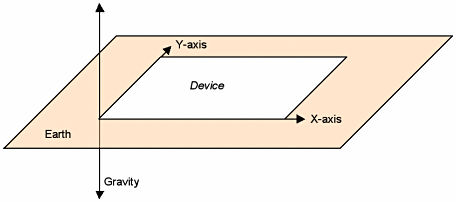
Converting Acceleration into Inclination Accurate inclination or tilt measurements are extremely demanding. For example, the amount of acceleration due to gravity in 1 arc degree of inclination from a horizontal plane is 17 mg. To be able to measure to within ±0.3 arc degree an accelerometer must be accurate to within ±5.2 mg and must have a DC response. In other words, it has to be able to measure the acceleration due to the Earth's gravity. Accelerometers that measure only changes in acceleration are not sufficient. Consider the dual-axis accelerometer situated in a plane horizontal to the Earth (Figure 5A).
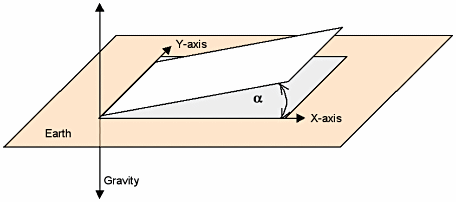
Because its two measurement axes are parallel to the Earth, each axis is experiencing no acceleration. As the plane is inclined (Figure 5B), the Y axis still experiences no acceleration because it is still parallel to the Earth, but the X axis experiences some acceleration due to gravity. This acceleration depends on the angle of inclination and is expressed as:
where:
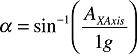
1 g = 9.8 m/s2 Because the accelerometer provides AXAxis, you can calculate the angle as:
|